How to Partition Disk in Windows System
How to Partition a Disk in Windows
The alias of the Windows operating system is the Windows operating system, which is an operating system developed by Microsoft Corporation of the United States and came out in 1985. The Windows system was originally an MS-DOS simulation environment. Since then, Microsoft has continuously updated and upgraded it to improve its ease of use, making Windows the most widely used operating system. At present, the Windows system has been updated to version 11, and many computer users are using the Windows system.
When you buy a computer, computer vendors usually help you set up the disk partitions of the computer. But there are also many people who want to repartition the computer disk after using it for a period of time. But how to repartition the disk? Here, the editor takes Windows system as an example to demonstrate the repartitioning tutorial of computer disk.
The computer disk partition is divided into the following steps:
First, right-click the Start icon and select the "Computer Management" option.
Step 2, click the "Disk Management" option in Computer Management, you can see the partition status of the computer disk in this interface.

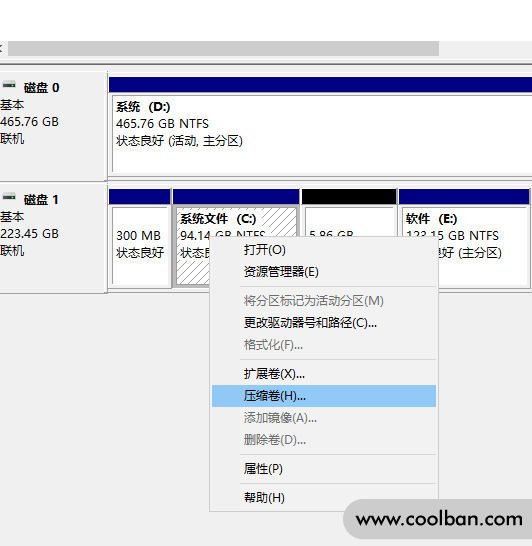
Step 3: Select the disk you want to split, right-click the disk, and click the "Shrink Volume" option. Here we take the C drive as an example.
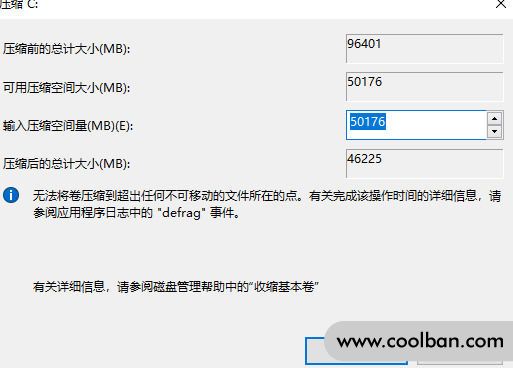
Step 4: Select the memory size you want to split in the "Compress Volume" option, and then click Compress.
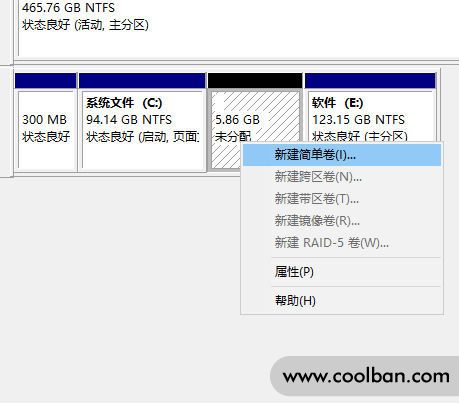
Step 5. After compression, there will be more unallocated partitions. Right-click on the unallocated partition and select New Simple Volume.
Step 6: Open the New Simple Volume Wizard, set the size and drive letter of the new partition, check the "Perform Quick Format" option, and click Next.
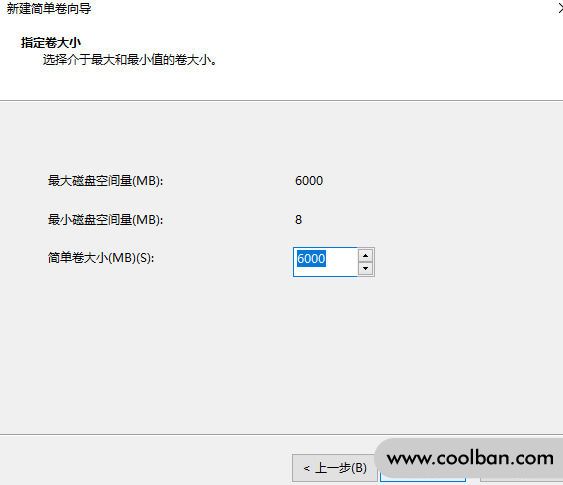
Step 7, you can set the size of the simple volume in this step, you can set it yourself or choose the default value.
Step 8. In this step, the computer automatically assigns a drive letter. Continue to click "Next".
Step 9, follow the computer prompts to add this new volume, then "Next".
Step 10: Preview all the information of the newly added volume, and click "Finish" after confirming that it is correct.
At this point, we have successfully repartitioned the computer disk.
So, if you want to merge the partitioned computer disk partitions in Windows system, what should you do?
First, right-click the Start icon and select the "Computer Management" option.
Step 2, click the "Disk Management" option in Computer Management, you can see the computer disk partition situation in this interface.
Next, you can merge two adjacent disks to expand the space of the partition.
Next, right-click the C drive, and after the menu pops up, click "Extend Volume".
After this step, the Extend Volume Wizard will pop up, click Next.
Select the partition you want to merge, then click Next, and finally we click Finish.
At this time, the partitions of the computer disk that have been divided are combined into one.
Here, I would like to remind everyone that in the operation of merging disk partitions, we can only merge two adjacent disk partitions into one. If two disk partitions are separated from each other, the two disk partitions cannot be merged into one. If you want to allocate the memory of one disk to another disk, pay attention to make the two disk partitions adjacent when splitting.
The above is the tutorial of computer disk partitioning and merging in Windows system, I hope it can help you.
